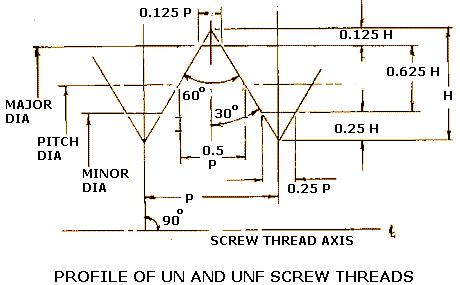
UN 系列螺纹形状以及参数
The most common screw thread form is the one with a symmetrical V-Profile. The included angle is 60 degrees. This form is prevalent in the Unified Screw Thread (UN, UNC, UNF, UNRC, UNRF) form as well as the ISO/Metric thread.
The advantage of symmetrical threads is that they are easier to manufacture and inspect compared to non-symmetrical threads. These are typically used in general purpose fasteners.
Other symmetrical threads are the Whitworth, and the Acme. The Acme thread form has a stronger thread which allows for use in translational applications such as those involving moving heavy machine loads as found on machine tools. Previously square threads with parallel sides were used for the same applications. The square thread form, while strong, is harder to manufacture. It also cannot be compensated for wear unlike an Acme thread.
Basic Size is the nominal size to which the tolerance is applied to determine the maximum and minimum material size.
Allowance is the difference between the design (maximum material condition, MMC)size and the basic size. See Unified Standard Series.
Thread Classes: The different thread classes have differing amounts of tolerance and allowance. Classes 1A, 2A, 3A apply t external threads; Classes 1B, 2B, 3B apply to internal threads. See Unified Standard Series.
Classes 2A and 2B The maximum diameter of uncoated (unplated) class 2A, (external) thread are less than the basic by the amount of allowance. When a coating is intended, the max diameter of class 2A may be exceeded by the amount of allowance. For an internal thread, the minimum diameters are basic whether or not coated (plated)--no allowance is available at the maximum metal limits. See Unified Standard Series.
Classes 3A and 3B are used for closer tolerances than those available from classes 2A and 2B. The maximum diameters of Class 3A (external) threads and the minimum diameters of Class 3B (internal) threads are basic, whether coated (plated) or not--thus no allowance or clearance is available for assembly of components at maximum material condition. See Unified Standard Series.
Classes 1A and 1B are the replacement threads for American National Class 1. They are intended for special applications involving replacement parts, for quick and easy assembly even when the threads are slightly damaged or dirty. See Unified Standard Series.
Coating (or plating) of threads The external threads should not be greater than basic size after plating, and the internal threads should not be less than basic size after plating. For electro-plated parts, Class 2A allowance is sufficient for the plating build-up. After plating the external threads should pass a basic Class 3A GO gage and a Class 2A NO-GO gage. Class 3A does not include an allowance--the class 2A allowance may be used as long as it is adequate for the plating thickness considered. Since only Class 2A external threads have an explicit allowance for coating, other classes both internal and external should have the size limits adjusted to allow for the desired coating thicknesses.
没有找到相关结果
已邀请:


1 个回复
pemn99 (威望:1)
赞同来自:
Robert E. Green, Editor
Industrial Press Inc. New York
有很详细又很实用的资料,象UNC螺纹等都有的。